Gameplay
Account setup and Character Planning
Download the Olympia Client from http://www.helbreath.net/download.
Creating a new Account
If you are new, you must create an account. Start the game and in main menu you can click 'New Account' to create it. Fill in all the blank spaces and click the 'Create' button. You must choose an account name which does not exist yet.
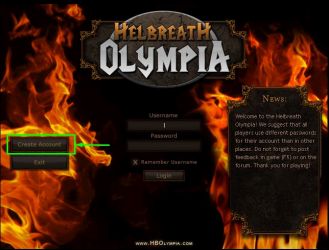
Main Menu
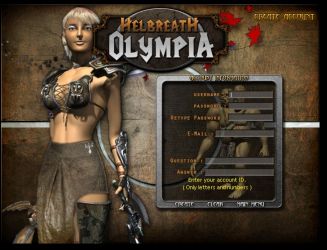
Create Account menu


Create a new Helbreath Character.

After you login to your account, you can create your character. You can have up to 4 characters.
Attributes Allocation
Each character has six specific attributes,the specific points determine the build of the character. Each time the character gains a level you gain three points to allocate to the attribute of your choice, until the maximum level of 140.
Attribute points range from 10 - 200.
Look at Character Development wiki page for more information.
Strength
Deal more damage with weapons, increase your carry weight, equip powerful weapons and armor.
Vitality
More health, less damage received.
Dexterity
Be harder to hit with weapons and hit more often with weapons.
Intelligence
Cast more powerful spells.
Magic
More mana, be harder to hit with spells and hit more often with spells.
Luck
Get crush damage bonus more often and get more loot from monsters.
Attributes allocation during character creation

As the image shows the game will allow you to select from three basic starting builds - Warrior, Mage or Master. Selecting one of them will allocate your 10 starting attribute points. You can also allocate these points yourself.
"Old school" builds are now balanced around the New Talent system and careful consideration of the attributes and bonuses gained or lost with each Talent will be needed to get the best out of your build.
Look at Character Development wiki page for more information.
Warrior:
If you want to swing weapons like swords, axes, hammers or shooting from a bow, you can make a warrior.
PFM Warr(36 Int), Zerker(59 INT), Haste(62 INT) and AMP Warr(112 INT) are all options depending on the style the player wishes to adopt.
Mage:
If you prefer to use magic, you should try a mage. Mages may have harder time to level-up at early stages, as compared with warrior. However, after learning some attack spells, mages can cast harmful spells on their enemies and show their great power. The reason, that mages have a difficulty in hunting, is the amount of mana. Without mana, it is next to impossible for mages to hunt and fight, after collecting a basic MP set a mage can begin their journey.
You can develop your mage in certain ways with INT, STR, DEX, and VIT.
Look at Builds wiki page for more character builds.
Basic Controls
Walking: Click the left mouse button on the screen where you would like to go, click the right mouse button to stop the action.
Running: Hold the 'Shift' key and left click anywhere to make you character run. 'Ctrl+R' will activate run mode. In order to run you must have stamina (SP).
Attack: Left click on enemy you wish to attack. Your character will move in range, if necessary, and then attack.

Standstill Attack: Right click to attack without moving. Especially useful for archery.
Oppression Attack: Enemies or allies. If you want to attack, hold 'Ctrl' key and click the character or activate Auto Attack mode with 'Ctrl+A'.
Critical Attack: For each 10 levels you gain 1 rechargable critical attack. Hold 'Alt' key to use the attack with melee or archery.

Differences between enemies and allies: Enemy players have red (or blue if low level) circle under their character.
Greeting: If you want to greet someone change to peace mode and left click on them.

Item Usage: Double click item in your inventory to use/equip it. You can also stack your armor sets in your inventory and use Control + Left Click to equip entire sets instantly.
Item Transfer: You can drag item from your inventory on the ground to drop it or on another player to give/exchange it.
For more advanced controls, see Commands & Hotkeys.
Entering the Helbreath World
| Welcome aboard! So whats on my screen? |

|
(1) The Mini Map: This helps you to get around. |
Leveling Up
Beginner Zone

When you enter the game you will arrive at the beginner map, here you can get used to the game controls and HUD (heads up display).
On your minimap you will see a blue dot in top right corner of the map. That is you.
A little south west of you is a pink dot - an NPC with a beginner quest. Accept it.
Now go south and kill enough slimes to finish the quest.
If you started as a mage, you will have Magic Missile in your spellbook. Otherwise just stab the slimes with your knife. Take care not to get surrounded, you can die easily in the beginning.
Once you are done, you should be level five. You should distribute your attribute points and you can select your first talent (or don't, you won't lose the option).
Next step is to pick the town you would like to fight for, Elvine on the right, Aresden on the left.
Town Farm

After choosing the town, you will be teleported to your town's Farm map. Here you can access shops to get basic gear, spells, potions and a warehouse to store your items.
On your minimap you will see fixed spawns of various monsters. You should get your next 10-15 levels killing monsters, progressing from slimes through ants and snakes to orcs. At level 15 you can get a snake oriented quest in the shop.
Monsters will drop gold, potions, equipment and various items. Equip what you can use and has the appropriate stats for your selected class. You can disenchant the rest using "control + E" to bring up the enchanting menu or sell it to the shop or blacksmith.
Mage
You want to buy mana potions to fuel your spells. When you get AoE spells, try to make monsters to bunch up by running around them so you can hit multiple targets with single spell.
Try to be mana effecient. Figure out which spells need how many casts to kill what you are hunting and pay attention to elements. Most monsters on Town Farm are Earth which calls for Fire. But Orcs are resistant to Fire.
Warrior
Get enough armor and a good weapon. Remember that weapons have upper strength limit. If you have less strength, you will swing slower.
Take advantage of corners and obstacles to break monster groups that would surround you. If you have Archery talent, you will want to take advantage of the piercing properties of your arrows so aim at distant targets.
Save some critical attacks so you can get out of group of monsters or so you can quickly finish off elite monster.
Once you feel strong enough to take on orcs, you can grab quest at the teleport pad to Town which is repeatable and tells you to kill 200 orcs and 2 elite orcs. The best approach is to take advantage of the Farm Dungeon. You can find entrance to it close to the village.
Once you enter the dungeon you will be forced into party with all players that are present there. That means that you will share experience for kills as long as you are close enough that you can see each other. Get to nearest orc spawn, or to the one that has another player in it to make it go easier (party members show up as green dots on minimap). You may notice that some players have red circle under them signaling that they belong to the other town. Fear not, they are in party with you here so they are treated as allies.
When you are done with the quest, Recall, claim reward and repeat. You can also do quests which are given in the dungeon itself. Continue till you get to level 40-50.
Mass Exp Party
When you have high enough level to enter other zones such as Garden, Promise Land or Death Valley, then you will want to join a mass experience gathering party.
Ideally, you want to go hunting with your guild but you can also join a public party.
These parties are usually advertised in Town chat as "mass DV" (Death Valley being the most common destination). You send a request for joining the party to the player spamming the chat by pointing mouse at their name in chat and pressing 'Ctrl+P'. Once you are in party, you should move to the map and find the party there (its useful to be able to cast invisibility on yourself so you don't get killed before reaching them, shop sells invisibility scrolls).
Your goal will be to keep up with the main body of the party to gain experience from their kills. Try to help to the best of your ability by casting AoE spells, buffing melee players with berserk/shield or killing off weaker straglers closing on party's mages. But most importantly, don't die.
This way you can get to max level in just a couple of hours.
Gearing Up
Getting to max level is the easy part, now you will need to obtain good equipment. That can be obtained by two ways - looting it from a monster or buying it from a player. If you are in a big guild, old members might just give you what you need. Or you can go on hunt with them and grab some of the items that would normally be disenchanted.
Without a guild it is going to be significantly harder. The drop rate is low for new players. It will get better over time thanks to your monster speciality leveling up as you keep killing the same monster but it is a slow process. You can however get a head start by investing attribute points to Luck which increases drop chance. That is usually not desirable so you might try to level up a second character for this.
A decent build for this purpose would be a Lightning + Holy mage with 150+ Luck, 182 Intelligence and the rest in Magic.
This character should be able to hunt even without equipment thanks to Holy allowing you to quickly regain mana. You can then send looted items to your main character or sell them to other players.